Sunday, November 20, 2011

The Vegetarian Reuben

This one's been a long time coming guys.

The Reuben is my all-time favorite sandwich. Oh yes. I have a weakness for sauerkraut. Just typing the word here is getting my glands going. It's a dee-licious ingredient that is only better in a hot sandwich with melted cheese all over it, and you know it.

But. The pastrami. Yeah, right? The pastrami just isn't the star of this sandwich, so why keep propagating doomed animals just to be the supporting role here? I found an excellent substitute, found easily at the local health food store and remedied in a few minutes with a few drops of tamari to give this sandwich just the tasty protein punch it deserves. You're welcome.

You'll need:
Rye sourdough slices (I used Danish rye bondebrød)
Sauerkraut, warmed through
Emmenthaler slices
Smoked tofu, sliced, and gently warmed on a pan with a few drops of tamari on each slice
"Russian dressing" - basically mayo and ketchup mixed well with a dollop of mustard too, if that's your thing

To just explain the smoked tofu, I found that it was still too bland, to I tried the method described above, and it did really turn out perfectly. As I said before, the sauerkraut is what makes this sandwich for me personally, but obviously, if you're a meat fan, I won't hold that against you, and this probably won't do it for you. We can still be friends regardless. But see? It looks pretty good!


Now, slather those slices with the sauce, layer your sandwich as you like, but may I suggest tofu on the bottom, sauerkraut, and then the cheese on top? The melting of the cheese works well this way I find, seeping more downward than outward.

Butter up your griddle and give that sandwich some heat on both sides, until the cheese is melted and the bread is perfectly browned.


Really nice.
I invited my friend Jakob over to test it, he'd never had this particular sandwich before - he had thirds.
Go!

Sunday, November 6, 2011

Colorful and Spicy Potato Salad

When an ex-boyfriend and I split, the thing I missed the most was this Indian vegetarian cookbook. I later brought it back into my life via Amazon, and to be honest, I've only ever made this lovely potato salad from it.

I don't make it slavishly anymore, following instruction to the t, but the idea is the same, and creamy potato salad with a spicy punch, and loads of color from the additions of pomegranate seeds and coriander. I adore fresh coriander!


The gist is simple, precook and quarter medium potatoes. Let cool.
Mix some low fat yoghurt with a bit of mayonnaise.
I then personally seasoned it with salt, pepper, a dash of garlic powder and piri piri.
I also added finely chopped red onion, but really, I think this can do without.
Give it all a good mix, and top with the pomegranate seeds and fresh, chopped coriander.

So simple, but it looks so daring on the table.
Delicious.

Sunday, October 30, 2011

Mummi Hukka's Karelian Pasties or Karjalan Piirakat

As some of you know, I have a Finnish connection. For over half my life, I've had a rather odd obsession with the country, its quirky inhabitants and even quirkier language. I lived there for half a year, going to the university in Helsinki. This quintessential Finnish dish is a comfort food for Finns and foreign exchange students like me alike. I'd often duck into Stockmann's bakery on the way to school and pick up one or two of these as a quick lunch.

Mummi Hukka is a good Finnish friend's grandmother, and the origin of this recipe. It's been made time and time again for years, so it's absolutely perfect!

These pasties are truly delicious any which way you eat them. Fresh, warm, or cold, for breakfast, lunch, or dinner, with munavoi (chopped hardboiled eggs in melted butter), butter, or a slice of cheese.

They can also be made with mashed potato filling, but I happened to have leftover rice after dinner today (I added milk, and boiled, simmered, added more milk, until I got a porridge out of it) .

Crust:
2 dl cold water
1 tsp salt
2 dl wheat flour
3 dl rye flour

Mix well, and roll out, thinly and evenly, atop a floured surface

Filling:
3 dl water
2 dl rice
8 dl milk
half a tsp salt

Bring to a boil, then simmer until you've got a good rice porridge

Check out the pictures for the next steps.

Heat the oven to 300 degrees Celsius.
Bake for about 15 minutes.
Moisten them with milk just after you take them out of the oven.
Enjoy!


Monday, October 24, 2011

Sloe (Slow) Gin

Just across the street from us is the Copenhagen version of Central Park. I've plucked my elderflowers there for over ten years now, but only just last year did I stumble across a patch of sloe bushes (trees?).

I put my boys to work the other day, and held the branches low so their nimble little fingers could grab as many ripening berries as possible. I say ripening, since sloe berries are only truly "done" after the first good frost. I dare not wait for it, since I'm certainly not the only good woman in this burrough looking forward to her own sloe brew.

So, you pluck them as late in the season as you dare. then freeze them yourself overnight. This breaks down their bitterness, and gets them ready to languish in the spirits of your choice for three months. I use gin.


This recipe is an idea gleaned from several sources.
400-500 grams of sloe berries, washed, frozen overnight, and thawed.
100 grams of sugar.
1 bottle of gin.

Shake daily until the sugar is dissolved.
Store a dark place for 3 (THREE!) whole months.
Strain through a sieve, then a cheesecloth.
Enjoy.


I've yet to taste this, it's my very first try with the sloe. I'll probably just enjoy it straight up, but if you have any suggestions for use in a cocktail, do pipe up!

Friday, September 30, 2011

Gingery, Crunchy Salad


I love this salad. I've loved it since the first time I tasted it at Atlas Bar way back. It's a crunchy mix of finely shredded white cabbage, red cabbage, and carrots (actually julienned). I added finely shredded sushi nori for a little more color, flavor and nutrients.

Then, warm some almonds on a hot pan, add honey and soy and gently warm through and mix.

Then, you make the dressing. The dressing's key.
Finely grate ginger and a clove of garlic (garlic's optional). Add a drop of sesame oil, a dollop of soy, a pour of vegetable oil, a bit of apple cider vinegar (or acidic whatever) and honey. A good squeeze of honey. And mix well, and pour over, and toss, and...yum.

Thursday, August 25, 2011

Rye Bread Chips


Was out diving with Mina again. I like going with other people best, it's kind of dark and lonely out there!

Anyway, I got a whole untouched, still wrapped mind you, loaf of organic spelt rye bread. Expiration date was still a day away, they probably chucked it to make room for new wares.

This particular bread is not one I buy myself, since I find it quite dry, but I'd been wanting to try making some rye bread chips for a while, something I've tried at an international festival here in Copenhagen. I remember it as being thinly sliced, crispy strips of rye bread, very crunchy, with an oily, garlicky flavor. Should be a cinch to reproduce!

It turned out pretty good, I'd say, though I didn'e have fresh garlic, only garlic powder, and I should have oiled the bread more before baking it. but here's a break down:

1 loaf of rye bread, not too many visible kernels, thinly sliced and cut into smaller strips
olive oil
garlic, either crushed and mixed with the oil, or powdered
salt

Arrange the strips on a piece of baking paper, coat liberally with garlicky oil, or add the garlic powder after oiling.
Sprinkle with salt.
Bake 15-20 minutes in a medium warm oven.

I took them out while they were piping hot and still a little soft, transferred them to a wire tray to cool, and they hardened up as they cooled. They turned out near perfect, and they kept well until the day after.

I happened to serve them as an hors d'oeuvres with Danish soft smoked cheese and chives.
Oldest kid got the rest for his lunch box day after - loved them!


So for divers, or those who just have an old rye bread at home going stale - this is an excellent, tasty and easy snack!

Friday, July 22, 2011

Isa


I don't think I've actually recommended this book here before (for shame!), but it really opened my eyes to a larger repertoire of vegan cooking. It's called Vegan with a Vengeance by Isa Chandra Moskowitz, and it's fabulous really. I love her recipes, and her writing, she's funny, and pragmatic and spunky all at once. Recommended! In fact, her book was the first place I fell over seitan as a meat substitute, a package of which I've got languishing in the fridge passed its "due" date. But it's vacuum packed, so it should be okay still, right?!

You can follow her on Twitter too, @IsaChandra. She makes me laugh there too!

Thursday, July 7, 2011

Pointed Cabbage Entré


This recipe is from Nikolaj Kirk's Hverdagsmad, which is a pretty good basic cookbook, nothing special in my opinion ("hverdagsmad" means everyday food, which explains it!), but I came upon this recipe and was really surprised to see pointed cabbage used any other way that as a finely shredded coleslaw ingredient or in a thick sauce as an accompaniment to potatoes. I quite like it, you can prepare the cabbage so that it's softer or crunchier, as you like, and the dressing is a nice protein rich and tangy affair. This can as easily be your dinner entré as it can be the side dish to chicken or anything else for that matter.

It was perfect as the main dish yesterday, with sides of corn and pan-fried halloumi cheese with tomatoes and avocado. A real summer meal.

You'll need:

2 eggs, boiled and chopped
2 tbsp capers, finely chopped
1/2 bunch of parsley, chopped (I used cilantro from my herb patch)
juice and zest of half a lemon (make it organic!), zest needs to be finely grated
1 dl olive oil (I used a mix of olive and flaxseed)
2 pointed cabbages
50 g. butter (I omitted this to save calories)
200 g. firm chèvre (I used a mix of feta and Danish rygeost - it's what I had!)
salt and pepper

Remove the darkest leaves from the cabbage and slice them lengthwise. Cover the bottom of a pot with about 2 inches of water and add salt, butter and cabbage. Cover and steam until the cabbage are still a bit crunchy.

Mix the eggs, capers, parsley and lemon zest with the lemon juice, oil and pepper.

Arrange the cabbage on a serving dish, and crumble the cheese on top of it with your fingers. Drizzle the vinaigrette over it until thoroughly coated, and you're all set!

Tuesday, July 5, 2011

Best No Knead Bread Yet!

Timewise, this bread takes a while. Effortwise, it's a cinch.

I've made no knead bread many times before, usually a dough that's quicky thrown together in the evening with just a few stirs, and in the morning, dropped in small portions on to a bakesheet. After 25 minutes or so in a cold started oven, it's wonderful breakfast breadrolls. Nothing wrong with that, this recipe just takes it to the next level. It's Jim Laheys' of course. It's everywhere these days, and after, once again, having it presented to me in the paper, I thought, now is the time.

Danish readers can check out the recipe here.

For the Yanks, I shall translate below. Look what you've got to look forward to!


You'll need:

Yeast, the size of a pea (or 1 gram dry yeast)
8 grams of salt
300 grams of water (10.5 oz.)
400 grams of flour (14 oz.)
1 pot with lid that are oven-safe

Here's what you do:

Step 1. Dissolve the yeast in the water (I used room temperature water), and add the remaining ingredients. Stir around in the bowl only until all the flour is moist. Cover the bowl with household film and let it sit out for 12-18 hours. 18 hours is better than 12 hours.

Step 2. Dump the dough onto a floured work surface. Fold it gently a few times. It's a bit runny, so make sure your hands are floured up. Oil the bowl and dump the dough back in for 2 hours of rising.

Step 3. Turn the oven on to 250 Celsius (475 Fahrenheit?) and put your oven-safe pot in to heat through. 30 minutes of its a Creuset, less if it's metal (which I used). When the pot is hot enough, take it out, dump the dough in it, cover with the lid, and bake for 30 minutes. After 30 minutes, turn the oven down to 230 Celsius (450 Fahrenheit) and remove the lid. Give it another 15 minutes.

When it's all done, take it out and let it cool off for 2 hours before tucking in.

It's so much better than my old no knead bread, though I haven't tried it as rolls yet, will get back on that. It's chewy, reminiscent of sourdough, in a milder version. It's a very satisfying baking experience!

Saturday, June 25, 2011

Red Beans and Yum


This just in!

I've been clearing my cupboards for those half used bags of what not, and decided to put these year old kidney beans to good use in a little something inspired by the red beans and rice I've had on trips to N'awlins in years past. Not much in the mood for meat these days, as bad climate change news is keeping me on the straight and narrow as far as habits go. Cutting meat out of your diet is one of the big ones as far as carbon emissions go, and I was afraid the flavor would take a hit, but with a little help from my friends, and some yummy chipotle powder I got from a friend, it was just perfect! I also substituted rice with bulgur, as it was also laying around in the cupboard, as well as it being healthier.

You'll need:
2 cups of kidney beans, soaked overnight
bulgur
1 can/box of crushed tomatoes
1 bell pepper, your choice of color, diced
1 yellow onion, sliced or diced how you want 'em
2 bay leaves
2 cloves of garlic, crushed and sliced or diced
1 tsp chipotle powder
1 tsp thyme
1 tsp oregano
salt and pepper
flour for thickening

Start by sauteing the onion, garlic and bell pepper in some olive oil in a pot. When they're soft and glassy, throw in the spices for a good mix around. Add the beans, bay leaves, tomatos and a little salt. Fill your pot with water until the ingredients are covered, and let simmer for 20-30 min. I used my pressure cooker since the beans were old-ish, and probably needed a little help. When it's about done, get your bulgur going, as much as you need for as many people as you are, it's usually half bulgur/half water. Taste the beans and add salt and pepper as needed. If it's a little runny, mix som flour with a little water in a bowl and add the mixture slowly over heat until it thickens.

That's it. Serve it up, pick out the bay leaves if you've got kids, and enjoy!

ps - I happened to add some pimentos that I had in a jar, and I added that along with the pimento water. I like the pimento flavor, but the water made it too acidic. I rememdied this by throwing in a teaspoon of baking soda at the very end. It neutralized the flavor just fine, but if you want to make this addition as well, I'd recommend a little caution!

Sunday, April 17, 2011

Kimchi


One should only be so lucky to be invited to one of Mina's kimchi slave mines. It sounds ominous, but really, all it is is a bunch of folks standing around getting chili paste up to their elbows while they smother cabbage, daikon, carrots and spring onions in it before stuffing in a jar and calling it kimchi. Then, she makes yummy Asian delicacies for you to eat before heading home with your new acquisition. Kimchi is so photogenic. And it tastes great with scrambled eggs, among other things. You should be so lucky!

Monday, April 11, 2011

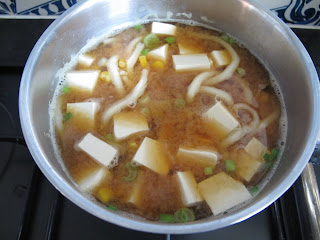
Easy Hot Lunch - Udon Noodle Soup

Yeah so, culinary adventures are just not my thing these days. I'm into sandwiches, easy homemade pizzas and pasta dishes lately. The more time I spend thinking bigger, better thoughts about my master plan (which encompasses everything), the less time I have to thinking about dinner.

I wanted a hot lunch the other day, despite my lack of creativity, and I luckily spied a package of forgotten udon noodles in the back of the fridge, hooray! So easy.

Hot water. Add udon.


Boil as the package instructs. Add miso (mine's vegan). Then I add a small handful of chopped spring onions and canned corn.


At the very end I add cubes of silky tofu. Don't heat them too much, or they'll disentegrate.


Less than five minutes. Hot lunch. So good.

Friday, February 18, 2011

Soupe Marocaine - Harira

As followers of my other blog know, I am in Morocco! I'm two weeks in, in a month stay at our "old haunt" in Essaouira. It's absolute bliss. We've been adopted by some locals, who are kind, so kind. We've been in the country, treated to the hospitality of Moroccan farmers, and their daughter Latifa has continued spreading the love. Yesterday, by celebrating Mikael's birthday (a week late) with cake, Moroccan crêpes, and the traditional soup for breaking the fast of Ramadan, harira.

I love this soup. I could eat it every day without getting bored. This also because each Moroccan person/family/restaurant makes their own variation. It can be vegan, vegetarian or with lamb, chicken or beef. However which way you like it. The main points of reference in this soup are the spices, chickpeas, lentils, tomatos, herbs and vermicelli pasta. Beyond that, you can pretty much do what you like. And it'll still taste fabulous!

Here's lovely Latifa, dishing it out for us and our friend the real estate agent here, Salah. I made sure to watch her closely, making mental and real notes. So here, I will first write out which ingredients you will be needing, and approximately how much, after that, there's a lot of gefühl going on. No matter, the outcome will be tasty. I promise. This particular version is vegetarian, but can be made vegan by using only olive oil, vegetable stock cubes and omitting the egg.


2 cups of chickpeas, soaked overnight
1 cup of small, dark green lentils, (pretty sure it was puy)
1 onion, finely chopped
2 tomatos, grated or finely diced
2 cups of finely chopped celery
1 cup of finely chopped coriander
2 eggs, whisked
a small handfull vermicelli pasta
3 tbsp spice mix: equal parts turmeric, powedered safran, powdered ginger
tsp pepper
salt to taste
3 tbsp tomato purée
1-2 tbsp smin (Moroccan rancid butter), or ghee
olive oil
2 vegetable boullion cubes
1 bay leaf

In a large pot (Latifa used a pressure cooker) mix the onion, tomato, chickpeas, lentils, celery, coriander and spices with a big dollop of the olive oil and heat up for a bit, stirring occasionally. After a few minutes, when the spices have released their flavor, and the vegetables and herbs are wilted a bit, add a cup of water and the tomato puree and bring to a boil. Add more water, until the pot is about 3/4 full. Now, this is where Latifa put the lit on the pressure cooker, and let it work its magic for half an hour. If you don't have a pressure cooker, I think you'll need to let this simmer for at least an hour, probably two.

Fast forward. After 30 minutes of pressure cooking, or after your hour or two of regular cooking, mix the flour well with a cup of water. Add slowly, little by little, to the still simmering pot, stirring all the while. Let it bubble and thicken. It must thicken, so if you need to make more flour/water and add it, please do, this soup must be thick! Add your bay leaf and stock cubes, and a small handfull of vermicelli pasta. Also, add more water, if necessary. While the pasta are cooking, add the whisked egg, slowly and little by little, while stirring. You should have something that resembles the "egg drop" in Chinese Egg Drop soup. When your pasta are done, add the smin (or ghee or olive oil), remove the bay leaf, and you should be done! Enjoy with bread if you like, but this is quite hearty by itself!

I hope its everything and more. This soup is made for hangovers, cold nights, sickly children or just whenever. I shall amend the recipe as I continue my Harira making career! Bon Appetit!